Potterware
Potterware is a browser-based application that you can run on campus or at home. You can design 3D-printable pottery without heavy technical knowledge; it is very beginner-friendly.
Potterware lets you change the width of your pottery at 5 different points, then use mathematical functions to twist, stretch, and reshape your design. Luckily, all of the math is worked out for you. Contact your instructor to learn how to log in.
Initial Settings
Before you start twisting and distorting your pottery, make sure that your initial settings will result in the look you want. All of these options are listed before the ABCDE settings.
- Printer Type
The most important step is selecting the correct Printer Type from the dropdown menu. Our printer is compatible with the Potterbot Duet XL setting.
If you do not remember to set the correct printer, the nozzle's coordinates will be misconfigured and your design will start to print off of the printing tray.
- Printer Speed
- Defaults to 100. This should be adjusted as needed through printer interface.
- Height
- The physical height of your piece in millimeters (1" is 25.4mm). Your piece can go from 4mm to 1500mm tall. The default value, 85, is about 3.3”. For our purposes, the maximum height should be about 400.
- Layer Height
Refers to how "squished together" the layers get, on a scale of 0-10 (default: 1.5). The clay will always come out of the printer based on the size of the attached nozzle, but this setting lets you configure how compressed those layers should be.
Low layer height will be very tight/squished and high layer height will be very loose and noodle-like.
We recommend a layer height between 1 and 2 for beginners. When in doubt, the default is a good option.
- Skirt Offset
- Only applies when you are printing a base. This is the “ring” that gets printed around the base and is intended to be cut away. The skirt can be offset from 0 to 50 (default: 17). We recommend the default or larger, not to exceed 25 on a standard bat.
- Base Layers
The base layer is used to print a base using the printer, versus attaching your pottery to a slab leaving an open bottom. This setting can go from 0-10 (default: 2).
Successfully printing a base is an ongoing investigation, and we currently recommend setting the Base Layer to 0.
- Base Layer Spacing
- Without a base, this setting will have no effect. This setting controls the number of revolutions or “rings” in the base. A higher number creates less-dense “rings” with fewer revolutions. This setting can go from 0-9.99 (default: 2.74). This setting’s impact with a base is an ongoing investigation.
- Scale Base Layers
Without a base, this setting will have no effect. Changes how much larger or smaller the base is compared to the design. This setting can go from 0-9.99 (default: 0.95). Increasing the scale to anything greater than 1 will extend the base outside of your pottery.
The Scale Base will change in size based on the diameter of “E” in the forming process and will also adjust when different wave types are applied.
- Scale X & Scale Y
X and Y each affect one horizontal dimension (Z is the height).
Stretches your design across the respective axis from 1-2.99 (default: 1). You can use this to make an oval-shaped form instead of a circular form.
Planar: Changing the Shape on the X Axis & Y Axis
This is your opportunity to create something complex! But be warned: Potterware cannot show you if a design will be stable when printed, and large differences in these values may result in a collapsed form.
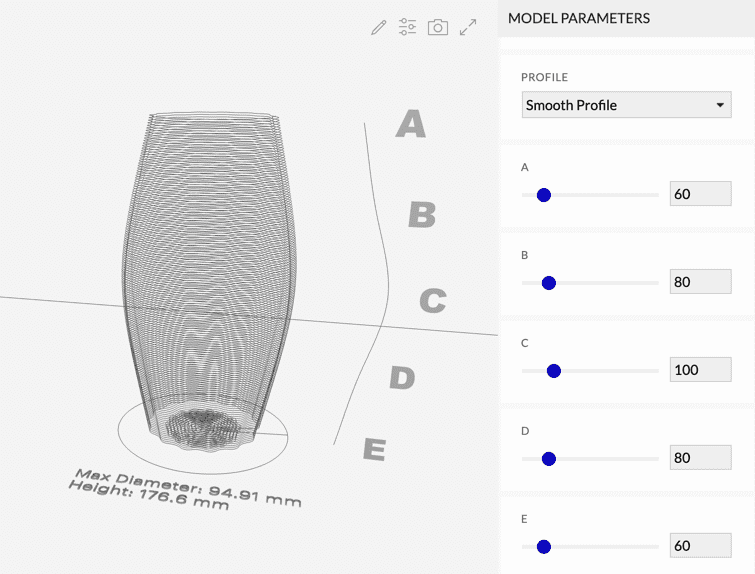
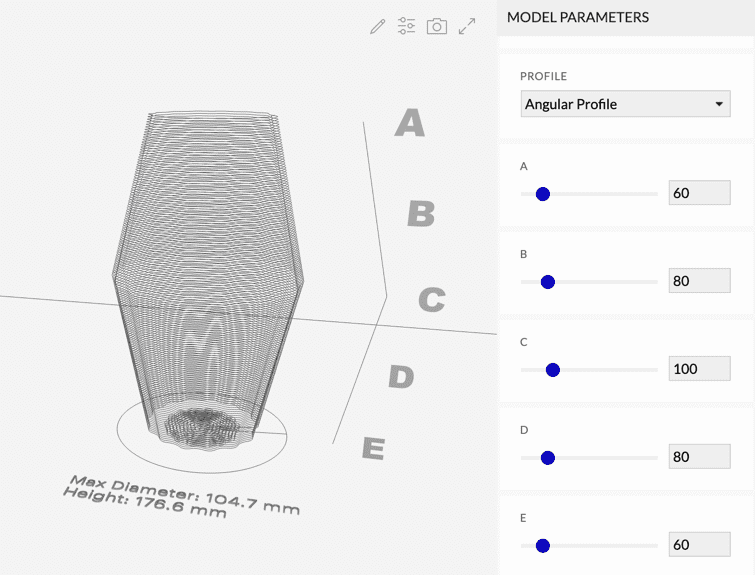
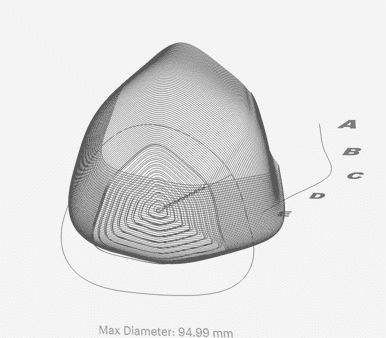
- Profile
- The profile of your pottery can be set to Smooth (default) or Angular. Here are 2 pieces with the same shape and other settings, but different profiles. Note that the maximum diameter of the design changed.
- Maximum Diameter
This advanced setting acts as a multiplier for the “ABCDE” values and will scale the profile values while maintaining the proportion between them. If adjusting the diameter, pay attention to the change of the written maximum diameter below the piece. Note that this setting isnot the physical maximum diameter.
This value can be set from 0-1000 (default: 100) and should not be changed without an understanding of a successful print.
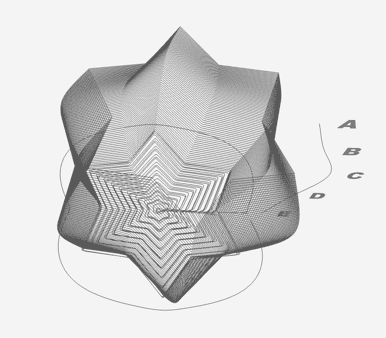
- A, B, C, D, E
- Modifies the width of your pottery in 5 different points on a scale of 0-500 millimeters (default: 100).
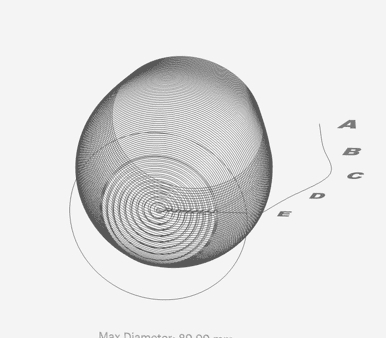
- Wave Type
- Select which mathematical wave should be used to decorate your pottery (default: Sinewave). Changes to the wave type are easiest to see from above with a base layer enabled.
- Cycle
- Unless you also change the Spacing, you will not see any changes when you modify this number. Cycle can range from 1-4 (default: 1) and specifies how many rows of "special effect" layers should be grouped together before inserting a smooth layer.
- Spacing
- Spacing can range from 0-4 (default: 0). Increasing the spacing adds smooth/non-wave layers between the wave effect layers.
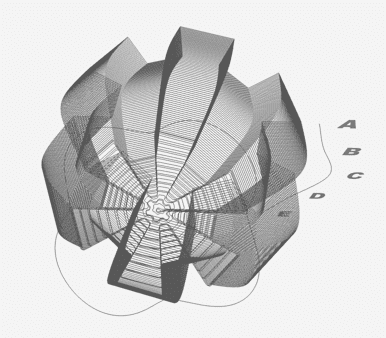
- Twist
- Adding a twist rotates the top surface from the bottom surface in 0-360 degree increments (default: 0).
- Interior Wave Offset
This setting applies to the special effect wave layers and offsets them “in” or “out” from the smooth layers. Changing this offset can create dynamic exterior and interior surfaces, but overextending it may cause the layer to separate from the form.
The offset can have a value between 0-10 (default: 1.5). Larger numbers move the wave effect “inside” and smaller numbers move the wave effect “outside”.
- Planar Repetitions
How many times the wave will wrap around the pottery horizontally, from 3-100 (default: 30).
With a high amplitude, this is twice the number of "corners". When you choose an odd number, you may notice a “start” and “stop” point on one side of the piece.
The higher the value, the busier the surface becomes. Lower values create simpler forms and can be used to create more architectural, geometric effects.
- Planar Amplitude
- How dramatic the wave effect is on the horizontal surface, from 1-40 (default: 4). High amplitude creates the largest difference between "in" and "out" points. Increasing the amplitude creates a surface with more depth, but in excess, this can create a droopy, noodle-like effect that may not be stable.
- Planar Starting % and Ending %
Both of these values go from 0-100% (default: 0). Starting Percentage specifies the vertical height where the special effect should begin, and Ending Percentage sets the height where the effect should end. You can use this to create a "band" on your piece with smooth layers above and below.
We recommend setting a starting percentage of ~5% when attaching a slab and an even higher starting percentage with more complex, higher-amplitude forms.
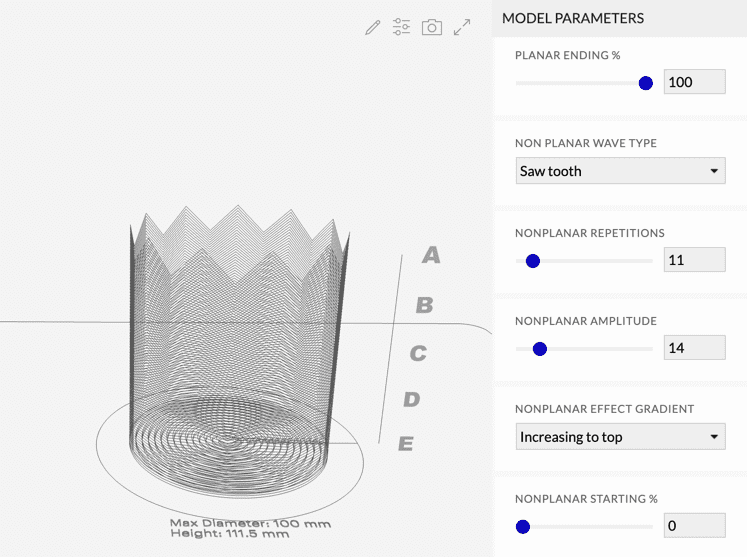
Non-Planar: Changing the Printed Rows on the Z Axis
So far, changes have affected the design by moving in and out horizontally (along the X-axis and Y-axis), but the overall printed rows have been smooth.
You can make changes along the Z-axis by adjusting the non-planar settings, such as the wave type, repetitions, and amplitude. The definitions are the same as the previous section, just affecting a different dimension.
For example, this design would otherwise be a perfect cylinder, but changes to the Non-Planar Wave Type and Non-Planar Amplitude made a "crown" effect.
- Non-Planar Wave Type
- Select which mathematical wave should be used to decorate your pottery on the vertical surface (default: None). Experiment with this only after gaining a base understanding of the printing process.
- Non-Planar Effect Gradient
The non-planar effect can increase from bottom to top (default) or increase to the middle of the design. The Increase to Middle setting will have an interesting vertical pattern, but not as dramatic as the uneven edge created by Increase to Top.
If a non-planar wave is not selected, this will have no effect.
- Non-Planar Repetitions
How many times the wave will move up and down along the Z axis the pottery, from 3-100 (default: 14). This provides additional visual interest.
If a non-planar wave is not selected, this will have no effect.
- Non-Planar Amplitude
How dramatic the wave effect is on the vertical surface, from 0-100 (default: 12). As the printer nozzle moves up and down, there may come a point where clay sticks to the nozzle and results in an undesirable “dragging” and “tearing” of the previous layer. This happens when the non-planar amplitude is set too high. Unfortunately, this is not a magic number and is design-dependent: your repetitions, wave type, and amplitude create a unique combination.
If a non-planar wave is not selected, this will have no effect.
- Non-Planar Starting % and Ending %
Both of these values go from 0-100% (default: 0). Starting Percentage specifies where the special effect should begin on the wall of the form, and Ending Percentage sets where the effect should end.
If a non-planar wave is not selected, this will have no effect.
Miscellaneous Settings
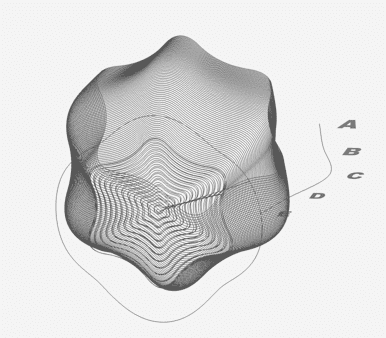
- Jitter Seed
Only applies when the Jitter wave type is selected. Jitter is a “random” setting in lieu of a traditional mathematical wave. Potterware doesn’t generate a true random value and instead uses a pre-generated set of values. Changing the seed uses a different set of values.
For a general understanding of how Jitter Seed works, set your wave type to Jitter, increase the planar amplitude and repetitions to 30, and view the shape from overhead.
Print Settings
Potterware has settings to print multiple copies of your design. Do not print multiples until you have successfully completed and fired a test print!
Not all of the settings in the final printing section apply to our printer. For our purposes, leave these values alone.
- Scara X and Y Position
- Not applicable to our printer. Changing these values will have no effect.
- Print Multiple
- May be used to print multiple copies of the same form. Not recommended for large forms, as all copies need to fit on the same bat.
- Multi-Print Spacing
Adjusts the gap between forms on a scale of 30-200 (default: 35).
Will not have an effect unless printing multiple forms.
- Multi-Print Retract Height
How high the printer nozzle should move on the Z axis before moving over to print another copy of the form.
Will not have an effect unless printing multiple forms.
- X and Y Count
How many copies of the form should be printed on each horizontal axis (default: 2). Left alone, this would result in 4 copies of your form being printed.
Will not have an effect unless printing multiple forms.
- Scara Count
- Not applicable to our printer. Changing these values will have no effect.
- Extrusion Speed %
- The speed in which the clay is pushed through the printer nozzle. This can instead be controlled with our printer software and should not be changed.
Saving Your Design
- Name Your File
- Choose a name that relates to the form you have created, as the GCODE cannot be easily opened and viewed after saving. “Triangular Vase with Large Twist” is more informative than “Vase”.
- Download Current Parameters
- Downloads a copy of your Potterware settings in a text document. This file cannot be reopened in Potterware and you will need to retype all of the values.
- Download GCODE
When you are happy with your design, click the Download GCode button. If you are on campus in the ceramics classroom, it will be saved in the Downloads folder. If you are off-campus or on another computer, you can bring your file(s) on a flash drive.
Your parameters are listed at the top of your GCODE file and can be viewed in a text editor (like Notepad).
Wait, what was that design again?
File organization is crucial, and it's helpful to see a preview of your form when referencing the parameters.
Take a screenshot of the design and put it in a folder with the GCODE file. That way, you can see a preview without retyping all the numbers or uploading your file to a GCode viewer.